Fixing the mode switch on a Canon SD600
So my family has a SD600. It works great. But the mode switch broke so you could not switch between photo, video and viewer mode. I guessed that it would be fixable and I was right!

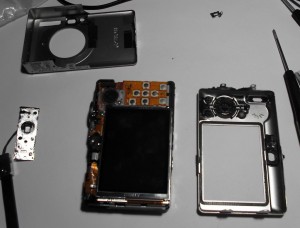
The camera in parts. Most of the parts are obvious, but the little metal piece and screw in the upper right of the image is the clip that connects the part that the user slides with the internal switch mechanism.
It was relatively easy to take off the case of the camera to access the switch. I read this page by Arnoud and it has decent directions and great pictures. I only did the first step (taking off the case) and there was one catch (literally). The instructions did not mention that there is an internal clip just above the view finder (sorry I forgot to photograph it). Once you take out all 6 screws you will need to work a small screw driver in between the front half of the case and the rear half and bend the front half away from the body of the camera and pull the from half off. It should pop off. The rear should then come off easily.
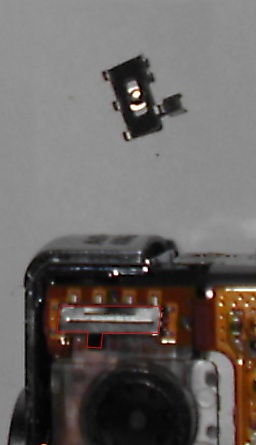
The actual internal switch turned out to point sideways and be connected to the external part that the user moves by a little metal plate on the inside of the case that interlocks with the switch and is screwed to the external switch throw a hole in the case.
I was able to screw the screw throw the plate and the case into an external piece as it was designed. However the external piece I used was just a little white nylon stub (one of the ones used to hold IC in tubes). I had to put a hole in it so that the screw could catch in the plastic and cut it’s own threads. I did not have a small enough drill bit (it would have needed to be like 1/32″ or less) so I used a sowing needle. It was too small for the chuck of the drill so I used some masking tape to give it more bulk. Since the needle doesn’t actually remove any material (it just compresses it out of the way) I needed to use a larger needle than I expected and it took some time and fiddling to get the screw to catch.
Once I had my external “switch” finished I screwed the screw through the plate and the case into the nylon stub. I made it to tight at first; it just needs to be tight enough to hold everything in place and loose enough to slide easily and to avoid bending the metal plate (it’s really thin).
The new switch works. But is sticky and feels really weird. But I was able to take and import pictures and video which is more than I could do before, so I’m happy. Also I think I could get a longer tiny screw and add a piece of flat plastic between the nylon stub and the case. This would stop the stub from sticking against the case.
Posted in Hardware

5:46 am
Brenda
Hi,
I have the same problem with my canon! What did you use as the nylon stub and where can I get it? Thanks!
Brenda
12:08 am
amp
I used what I think was a nylon standoff for something. I’m not sure. I just had it laying around. You might be able to go to a hardware store and pick-up a small nylon screw. A warning: This fix didn’t last what well the nylon part fell off fairly quickly.